Implementing Dual Layer Auto Tiling With 5 Tiles

Auto tiling is a powerful technique in 2D gamedev that allows you to build levels much easier by setting a tile as populated or not, and having the editor programmatically place the corresponding tile.
Typically this involves checking the 8 neighbours and choosing from 16 to ~47-56 Tiles. In theory there are 256 permutations, but you can get away with creating much less. Of course you could create a world with just 1 tile, but we are after painted edges.
This post shows an implementation of a system I discovered from Nonsensical 2D’s video that uses just 5 tiles. The concept is engine-agnostic but part 2 will be turning it into Godot specific tooling.
How it works
The core concept is to separate the tilemap into 2 tilemaps: one for physical tiles with colliders, and one for visuals. By separating the visuals from the physical, we can offset the visuals by -0.5 tiles and paint a tile by it’s corners, as shown below:
This gives each tile 4 neighbouring tiles between the other tilemap or just 16 permutations. We can represent this as a 4-bit mask and map each permutation to a visual placement.
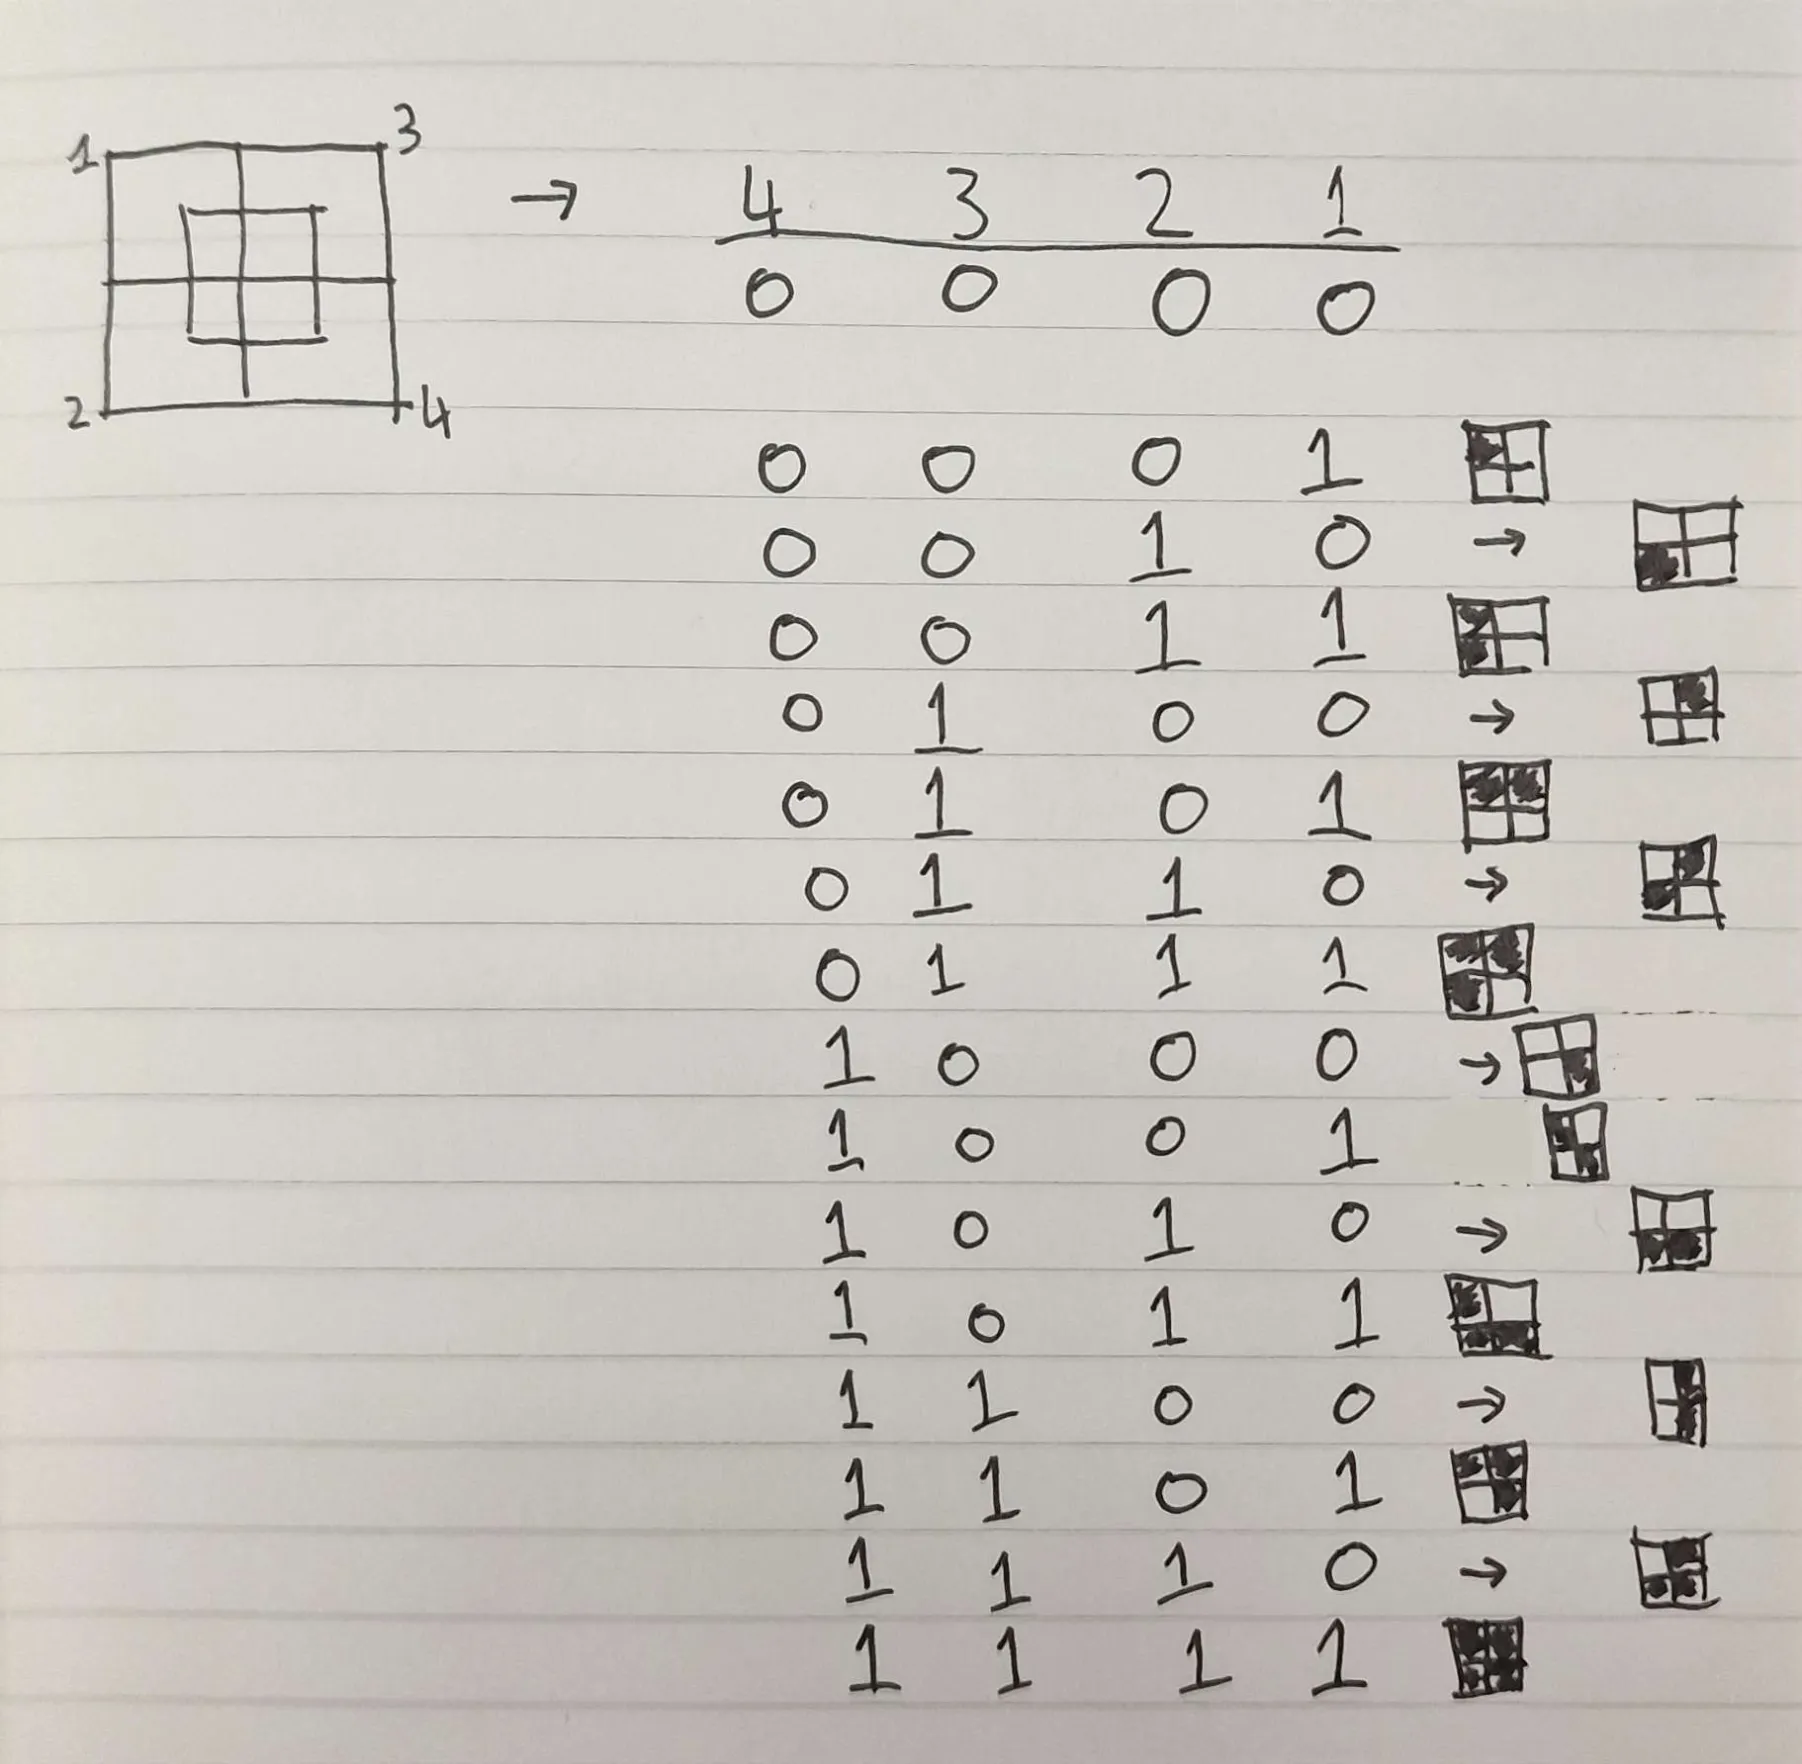
Then for each 4 visual neighbours of a physical tile, we check their physical neighbours to know which permutation to place.
Note: For corners you need to place the visual tile that opposes the occupation representation i.e. if there is a neighbour in the bottom-left, you will need to place the visual tile that occupies the top-right quadrant of the visual tile; for the physical tile it is the bottom-left, but for the visual tile it is the top-right*
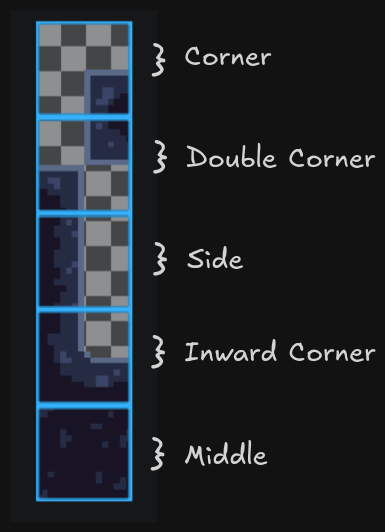
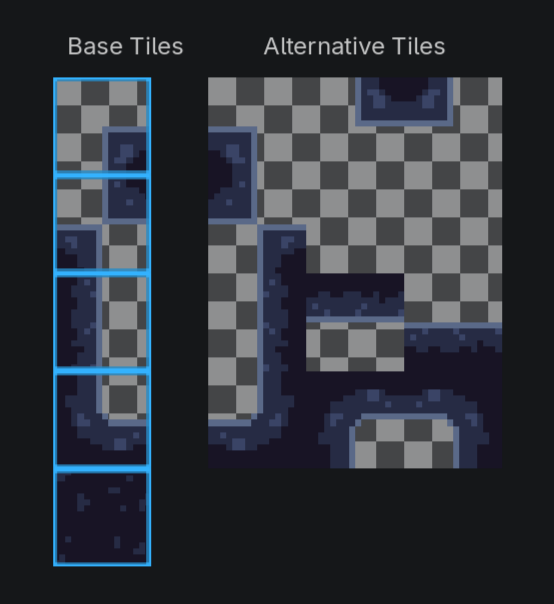
Since we are painting visuals by their corners, we can reuse textures to compose other variants by rotating them in editor or in the placement script. This means we only need: a corner, a side, opposing corners, inwards corner, and a full / middle piece - 5 tiles.
From these 5 tiles, we can rotate or flip the tile programmatically, as needed, to create the 16 different tile pieces. I store the 16 pieces in an array which is accessed by index corresponding to the binary value of the bitmask - it is important to setup your array in this order. In Godot, we can create alternative tiles directly in the editor and they are given coordinates in the texture atlas so we can simply store the coordinates. For other implementations, you may want to store the tile atlas coordinate + rotation instructions.
@onready var tileArray: Array[Vector2i] = [ # Encodes 16 tile permutations as a u4 bitmask / index
	Vector2i(4,0), # 0000
	Vector2i(0,3), # 0001 TL
	Vector2i(0,1), # 0010 BL
	Vector2i(2,0), # 0011 BL TL
	Vector2i(0,2), # 0100 TR
	Vector2i(2,3), # 0101 TR TL
	Vector2i(1,0), # 0110 TR BL
	Vector2i(3,2), # 0111 TR BL TL
	Vector2i(0,0), # 1000 BR
	Vector2i(1,1), # 1001 BR TL
	Vector2i(2,4), # 1010 BR BL
	Vector2i(3,0), # 1011 BR BL TL
	Vector2i(2,2), # 1100 BR TR
	Vector2i(3,3), # 1101 BR TR TL
	Vector2i(3,1), # 1110 BR TR BL
	Vector2i(4,0), # 1111 BR TR BL TL
]
Make sure to order your tiles in the binary order corresponding with the bitmask representations of neighbour occupation.
To use the script at runtime we need a method of placing the physical tiles. Bind a mouse input event to get the global mouse position and map it to the tilemap coordinates. We can then set that cell as populated in the physical tilemap layer and call the function to place visual tiles as described above. To erase a tile, bind an opposing mouse event similarly but it should set the cell as unpopulated. We can then update the visual layer by removing the 4 neighbours and calling the visual placement function again.
I recommend to include another function to update all tiles’ visuals. This allows us to place just physical tiles outside of runtime and call the update_all function at runtime to place the visuals for all tiles; I have bound this to a UI button. It works by clearing the visual tilemap, iterating over all populated physical tiles and placing the visuals again.
The next step is to save the level at runtime so that it reflects back in the editor. In the next section, I will describe a Godot-specific implementation of the tooling to do so. You can access the full code for tile placement + level management tooling via my GitHub.
Godot Tooling
I have setup the dual TileMapLayers as so:
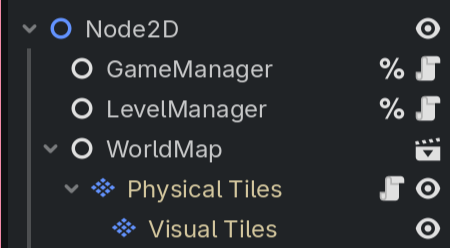
WorldMap is simply a container Node. My auto-tiling script is attached to my Physical Tiles layer. Create a separate node for level management and in a new script we can define our level saving logic.
Saving
First, we need to find our WorldMap container Node in the tree and keep a reference to it. We can then do the same for our physical tile layer, and using the physical layer we can do the same for our visual tile layer. We now have 3 references to our container, physical tiles, and visual tiles.
For each of the tilemaps, we need to serialise them and we can store those results in a dict accessed via keys “Physical” or “Visual”. Serialisation works by iterating through all populated cells and appending to an array a dict containing it’s position, source_id, atlas_coords, and alternative_id. If you are adapting this to another engine, substitute alternative_id with your needs such as rotation instructions. To finish serialisation, we can return this array in a dict with a key of the path to the tileset and a value of the array of cells dicts. We model the data this way because every cell in a tilemap layer shares the same tileset, so storing it for every cell would be wasteful.
var data := {
		"physical": _serialize_tilemap(physical),
		"visual": _serialize_tilemap(visual)
	}
Generates data as such:
data =
{
  "physical": {
    "tile_set": "res://Tilesets/physical_tileset.tres",
    "cells": [
      { pos, source_id, atlas_coords, alt },
      { pos, source_id, atlas_coords, alt },
      ...
  ]
  },
  "visual": {
    "tile_set": "res://Tilesets/visual_tileset.tres",
    "cells": [
      { pos, source_id, atlas_coords, alt },
      { pos, source_id, atlas_coords, alt },
      ...
  ]
  }
}
Then save this data. In Godot, runtime data must be saved in user:// rather than res:// because res is read-only during runtime to prevent editor corruption. Attempts to save to res are blocked by Godot. Therefore, we must save the data to user:// and later import the data as real res:// scenes to reflect the changes into the editor.
Importing with EditorPlugin
For a nice developer workflow I have created an EditorInspectorPlugin which adds an import button to the WorldMap inspector. When clicked, it reads the WorldMap data from user://, builds a duplicate WorldMap node with the data, overwrites the scene in res://, and refreshes the editor’s file system which updates the scene. This is a nice solution because the import button lives inside the WorldMap inspector for contextuality and to avoid clutter.
An important caveat is that we cannot load an EditorInspectorPlugin directly from plugin.cfg. Godot requires and EditorPlugin at the top level. However, we can use the EditorPlugin to create the InspectorPlugin.
@tool
extends EditorPlugin

func _enter_tree():
	add_inspector_plugin(
		preload("res://addons/```WorldMap```_importer/world_map_inspector.gd").new()
	)

func _exit_tree():
	remove_inspector_plugin(
		preload("res://addons/```WorldMap```_importer/world_map_inspector.gd").new()
	)
For the InspectorPlugin, the script adds a button which connects to a function which imports the tilemap data, sets the tiles for the two tilemap layers, constructs a new WorldMap PackedScene using it, and saves it over the existing scene before refreshing the file system in the editor. Full code for this can be found on my GitHub.
Relevant resources:
That’s all! Thank you for reading my first blog post. Follow me on the platforms in the footer so I look cool online and subscribe via RSS if you want to catch the next one.